At its core, screen printing involves using a mesh screen, ink, and a squeegee to transfer the desired image onto a surface. But what sets screen printing apart is the level of detail and precision that can be achieved. Whether you’re a beginner looking to learn the basics or an experienced artist wanting to refine your skills, understanding the screen printing process is essential for creating stunning prints.
In this article, we will take a closer look at each step of the screen printing process, from preparing the screen and creating the stencil to applying the ink and curing the final print. By the end, you’ll have a comprehensive understanding of how screen printing works and be ready to embark on your own creative journey.
Step-By-Step Guide On How To Screen Print
Screen printing is a popular technique used in various industries, such as printing art prints or creating designs on textiles. It involves the use of a mesh screen, a stencil, and ink to transfer a design onto a desired surface. This step-by-step guide will walk you through the screen printing process, from creating a design to applying the ink onto the material. By following these simple steps, you will be able to achieve detailed and professional-looking prints with ease.
Preparing The Design
The first step in screen printing is to prepare the design that will be printed onto the desired material. One way to do this is by transferring the image onto a printing board. A transparent acetate film is commonly used for this purpose.
To create a screen or stencil, the image on the acetate film is transferred onto a mesh screen. The screen is usually made of a fine mesh material, such as polyester, with a specific mesh count. This mesh allows the ink to pass through onto the material being printed.
Transferring The Image Onto The Printing Board
Transferring the image onto the printing board requires the use of the popular photo emulsion stencil method. This method allows for intricate and detailed designs to be transferred onto the mesh screen.
To begin, coat the mesh screen with a light-reactive emulsion. This can be done by pouring the emulsion onto the screen and using a squeegee to spread it evenly. Make sure the entire screen is covered with a thin layer of the emulsion.
Next, place a transparent acetate film with the original image onto the coated mesh screen. Align the image with the desired position and press it firmly onto the emulsion.
Now, expose the screen to a bright light source for a specific exposure time. The light will cause the emulsion to harden, except for the areas covered by the image on the acetate film. This creates a stencil on the screen.
After the exposure time, carefully remove the acetate film from the screen. You will notice that the hardened emulsion on the screen has created a clear and defined area where the image was located.
Applying A Light-Reactive Emulsion To The Mesh Screen
To prepare the mesh screen for screen printing, the first step is to apply a light-reactive emulsion. This process allows for the creation of a stencil on the screen, which will determine the design that gets printed onto the material.
To apply the emulsion, the screen should be coated on both sides. Start by pouring the light-reactive emulsion onto the screen. Use a squeegee to spread the emulsion evenly across the entire surface of the screen. It is important to ensure that the emulsion is spread thin and evenly, as this will contribute to the quality of the final print.
After the emulsion has been spread, allow the screen to dry for about 10 to 20 minutes. This drying time will enable the emulsion to solidify and adhere to the screen properly.
The light-reactive emulsion acts as a barrier that protects the areas of the screen where the ink should not pass through. Only the areas where the emulsion has been removed will allow the ink to pass through and create the desired design. This is why it is crucial to apply the emulsion correctly and evenly.
Exposing The Mesh Screen With Bright Light And Transparent Acetate Film
Exposing the mesh screen is a crucial step in the screen printing process as it determines the accuracy and quality of the final print. This involves using bright light and transparent acetate film to transfer the desired image onto the screen.
To begin, place the transparent acetate film with the desired design on top of the mesh screen. Make sure to align the stencil accurately with the screen to ensure a precise print. This step is crucial for achieving a clean and detailed design.
Next, it’s time to expose the image onto the screen. Turn on the light source, typically a bright light or UV light, and position it above the screen. Leave the light on for around 15 to 20 minutes. During this time, the light reacts with the light-reactive emulsion on the screen to create a chemical reaction.
The bright light passes through the transparent areas of the acetate film and hardens the emulsion beneath, creating a stencil that will allow ink to pass through during the printing stage. Meanwhile, the areas covered by the opaque parts of the film will remain soft and wash away later.
After the exposure time is complete, carefully remove the transparent acetate film from the screen. Check if the image has been successfully transferred onto the screen by inspecting the stencil. If the exposure was done properly, the design should be clearly visible, ensuring a clean and accurate print.
Exposing the mesh screen with bright light and transparent acetate film is a critical step in the screen printing process. It allows for the creation of detailed designs and ensures accurate printing results.
Washing Out The Original Image From The Mesh Screen
After the exposure process, it’s time to wash out the original image from the mesh screen. This step is crucial to reveal the stencil that will allow ink to pass through during the printing stage.
To wash out the original image, start by wetting the screen with water. Use a handheld shower head, sink sprayer, or pressure washer on a low setting to gently rinse the screen. This will help loosen the light-sensitive emulsion in the areas of the design that were exposed to light.
Continue rinsing the screen until you start to see the image appearing clearly. It’s important to be patient and avoid rushing this step as excessive force can damage the stencil.
Once the original image is fully washed out, thoroughly inspect the screen to ensure all areas have been cleaned properly. Check for any missed spots or areas where the design might have not fully washed away.
If you notice any gaps or imperfections in the stencil, carefully cover them with masking tape to prevent any ink from seeping through during the printing process. This will help maintain the integrity of the design and ensure a clean print.
Mixing Water-Based Inks For Silk Screen Printing
Mixing water-based inks for silk screen printing involves a careful process to ensure accurate colors and smooth printing results. Here’s a step-by-step guide on how to properly prepare and mix water-based inks for your screen printing projects:
1. Gather your materials: Start by gathering all the necessary supplies, including water-based inks, mixing containers, a palette knife or spatula for stirring, and a scale or measuring tools for accurate measurements.
2. Prepare the inks: Place each color of ink in its own clean container. Label each container with the name of the color to avoid confusion during the printing process.
3. Measure the ink: To achieve accurate colors, measure out the desired amount of ink for each color. Use a scale or measuring tools according to the manufacturer’s recommended ratios or your desired color intensity.
4. Strain the ink: Before pouring the ink into the screen, strain it through a fine-mesh fabric or nylon stocking to remove any impurities or clumps that may affect the print quality. This step ensures smooth ink flow and prevents clogging.
5. Adjust ink consistency: Water-based inks can have different viscosities, so it’s important to adjust their consistency for optimal printing. Add small amounts of water or a professional ink reducer according to the manufacturer’s instructions until you achieve the desired viscosity. This step ensures smooth and even ink coverage on the fabric or paper.
Loading Ink Into A Squeegee And Applying It To The Flat Surface
To load ink into a squeegee and apply it to a flat surface, follow these step-by-step instructions.
1. Prepare the ink: Begin by preparing the ink you will be using. Make sure to label each container with the correct color name to avoid confusion later on. Choose the appropriate type of ink for your project, whether it be water-based or another type that suits your needs.
2. Measure the ink: Accurate measurements are crucial for achieving the desired color and consistency. Measure out the required amount of ink for each color, following the recommended ratios provided by the manufacturer or based on your desired color intensity. Use a scale or measuring tools for precise measurements.
3. Strain the ink: To ensure a smooth printing process and prevent any impurities or clumps from affecting the print quality, strain the ink through a fine-mesh fabric or nylon stocking. This step guarantees a clean and consistent ink flow, reducing the risk of clogging.
4. Adjust ink consistency: Different inks can have varying viscosities, affecting their ability to spread evenly on the surface. Add small amounts of water or a professional ink reducer according to the manufacturer’s instructions to achieve the desired consistency. Adjusting the ink’s viscosity will provide smooth and even coverage during the printing process.
5. Load ink onto the squeegee: Use a palette knife or spatula to scoop the desired amount of ink onto the squeegee blade. Spread the ink evenly along the length of the blade, ensuring it covers the entire width. The loaded squeegee is now ready for application.
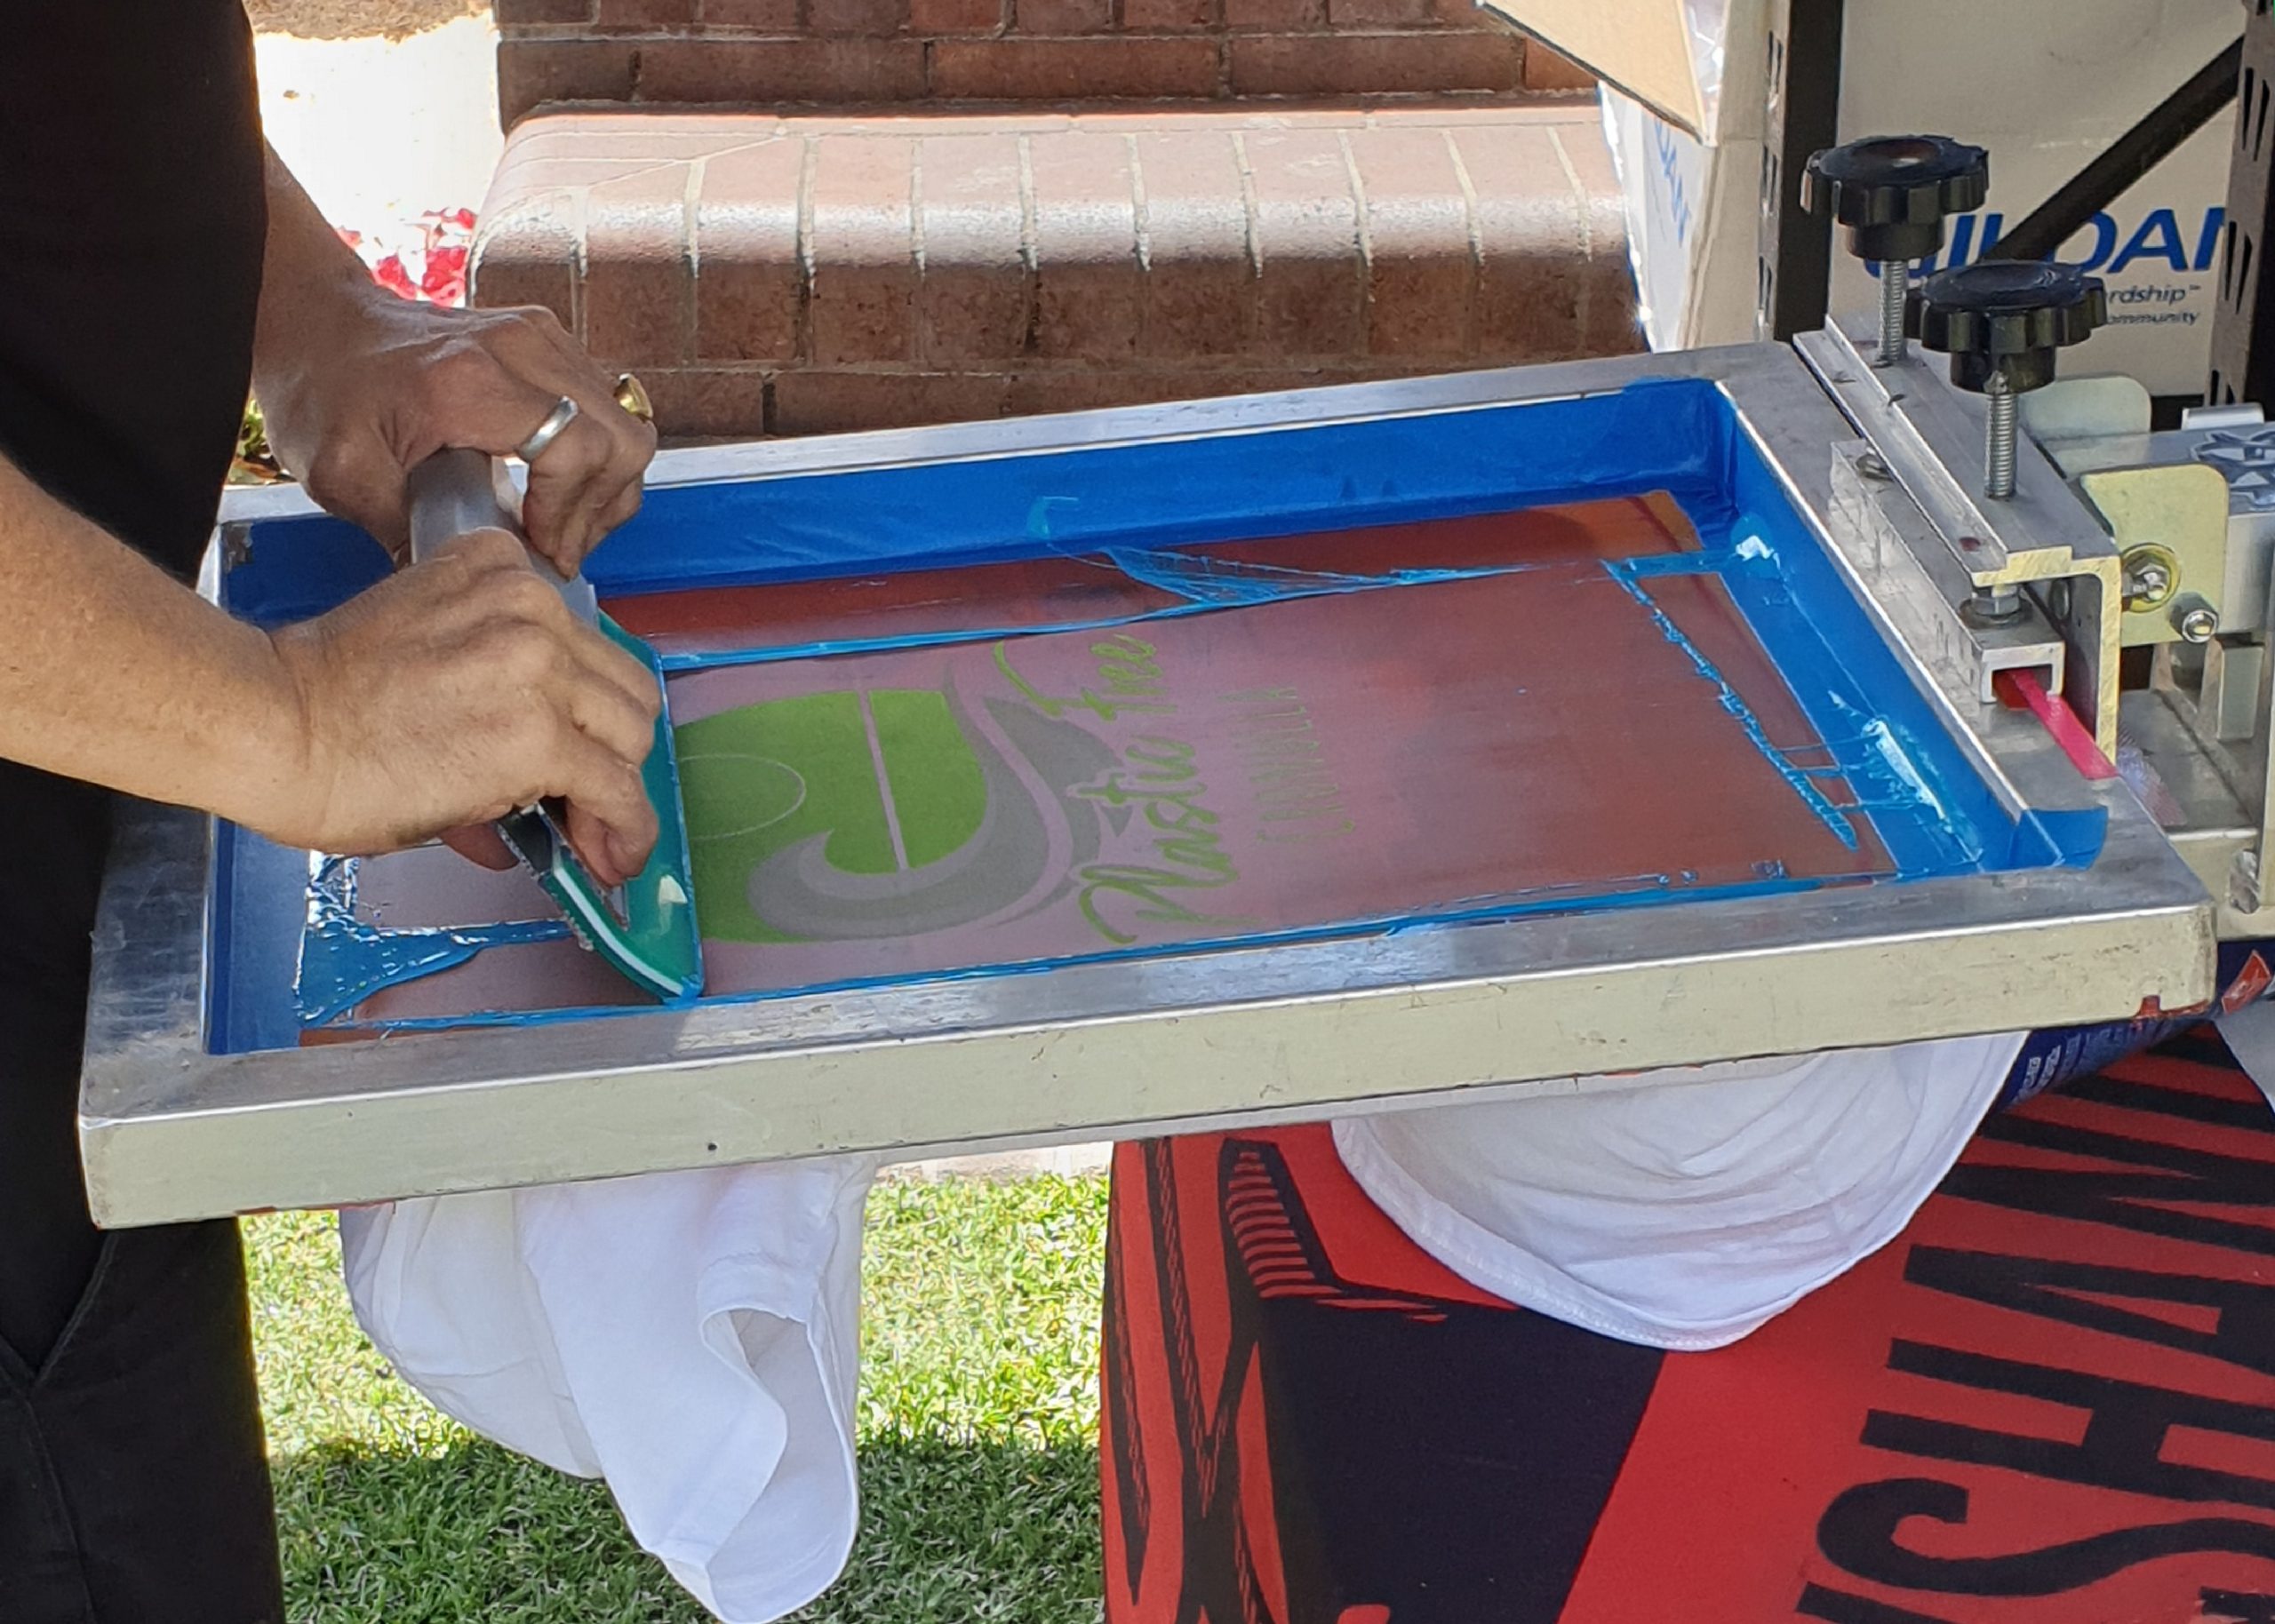
6. Apply ink to the flat surface: Position the screen with the prepared stencil or design over the flat surface you wish to print on. With the loaded squeegee in hand, hold it at a 45-degree angle and apply firm, even pressure as you drag the ink across the screen. Make sure to cover the entire design area with a smooth and consistent pass of the squeegee.
Removing Excess Ink From The Printed Area With A Separate Screen And Mesh Count
To remove excess ink from the printed area in screen printing, a separate screen and mesh count are used. Here is a step-by-step guide on how to remove excess ink effectively:
1. Lay the separate screen: Once you have finished applying the ink to the flat surface using the squeegee, place a separate screen, often made of transparent acetate film, on top of the printed area. Ensure that the screen covers the entire design.
2. Gently run the squeegee: With the separate screen in place, use the squeegee to run across the screen with light pressure. This step helps remove any excess ink from the design without smudging it. By using a bright light source, you can check if any traces of excess ink remain.
3. Clean the separate screen and mesh count: After removing the excess ink, carefully lift the separate screen and clean it. Rinse the screen with water or use a mild detergent to remove any remaining ink. It’s important to clean the screen thoroughly to avoid ink residue interfering with future prints. Similarly, clean the mesh count to ensure proper ink flow for subsequent prints.
Curing Or Drying The Finished Product
After the screen printing process is complete, the next step is curing or drying the finished product. This step is crucial as it ensures that the ink adheres properly to the fabric or substrate and allows the design to last longer.
In screen printing, the printed design is heat-cured by passing it through a dryer. The heat helps to evaporate the solvents in the ink, allowing it to dry and bond with the fabric or substrate. The curing temperature and duration depend on the type of ink being used and the fabric or substrate. Typically, a higher temperature and longer drying time are required for water-based inks compared to plastisol inks.
Before the finished product is considered complete, it is essential to check and wash it to remove any residue. This step involves carefully inspecting the print for any imperfections, such as smudges or inconsistencies in the ink coverage. Any residual ink should be removed to ensure a clean and professional-looking final product.
To wash the printed item, it is typically soaked in warm water with a mild detergent. Gentle agitation helps loosen and remove any remaining ink or chemicals. Afterward, the item should be rinsed thoroughly to remove all detergent residue. Finally, it is air-dried or passed through a dryer at a lower temperature to remove any remaining moisture.

Conclusion
Screen printing is a versatile and popular technique for customizing fabrics and creating one-of-a-kind designs. By using heat-curing techniques, the printed design bonds with the fabric or substrate, ensuring durability and longevity. Checking and washing the finished product is crucial to remove any imperfections and residue, resulting in a clean and professional-looking final product.